So, if your website suddenly gets a lot more visitors, things might slow down, right? That’s when load balancing steps in. It spreads the visitors across different servers and this makes sure no single server gets too much traffic. This way, everything stays fast.
If your current server can’t handle the load anymore, then it’s probably time to think about adding load balancing.
You’ll probably come across terms like Layer 4 and Layer 7 while learning about it.
So what’s the deal with those?
Let me compare layer 4 vs layer 7 load balancers so you know which one fits your needs.
What Is a Load Balancer?
A load balancer directs traffic on your website. It sends requests to servers that are not busy.
When more people visit your site, the load balancer sends traffic to servers with room. This keeps things running smoothly.
There are two types: hardware and software load balancers.
Hardware load balancers are physical devices. They sit between your server and the internet. They’re faster, but they cost more.
Software load balancers are apps that run on your server. They cost less and are easier to set up. They might not be as fast, though.
Both help keep your site running fast when traffic spikes.
Effortless Load Balancing with Cloudways Autonomous
Experience seamless load balancing and Kubernetes-powered autoscaling to handle traffic surges, ensuring your WordPress site remains fast and secure.
What Is Layer 4 (L4) Load Balancing?

Layer 4 handles how data travels across a network. When data is sent, it breaks into smaller units called packets.
Each packet has key info. It tells where the data came from and where it’s going. It also shows which port will handle the data on the other side.
Layer 4 load balancing looks at the packet’s basic details. Things like the IP address and port. It doesn’t look at the actual content. This is usually enough to direct traffic efficiently. No server gets overloaded.
There are a few common ways to balance traffic in Layer 4:
- Round-robin: Traffic is sent to servers in order, one after the other.
- Weighted round-robin: Some servers get more traffic based on their ability to handle it.
- Least connections: The server with the fewest active connections gets the next request.
- Weighted least connections: Servers with more capacity get more traffic, based on their connections.
These methods help evenly distribute traffic, making sure no server is overloaded.
What Is Layer 4 (L4) Load Balancing Used for?
Layer 4 load balancing is used when the contents of the data packets aren’t necessary for deciding where to send traffic within the server pool. It’s a simpler, faster approach because it focuses on basic packet information, allowing for quick routing.
This type of load balancing is commonly used with UDP-based applications like video streaming, voice calls, and core internet services such as DNS, SNMP, and DHCP.
If you need fast routing but don’t require deeper analysis of the data, Layer 4 load balancing should work well.
Pros and Cons of Layer 4 Load Balancing
| Advantages | Drawbacks |
| Fast and efficient routing of traffic. | Limited to routing based on IP and port, not the actual content. |
| Easy to set up with minimal changes to existing infrastructure. | Cannot perform complex routing decisions like application-level routing. |
| Works well for high-traffic applications that need quick responses. | Does not support advanced features like SSL offloading or traffic inspection. |
| Transparent to backend servers, preserving the original client IP. | Does not allow fine-tuned routing for specialized traffic like video streaming or web apps. |
| Ideal for simple, fast network services like DNS or video streaming. | Can be less flexible compared to Layer 7 load balancing for complex applications. |
| Provides high availability and redundancy. | Not suitable for applications that need deep packet inspection or advanced security features. |
| Maintains a direct connection between clients and backend servers, which improves performance. | Not ideal for modern cloud environments where more granular control over traffic is needed. |
| Reduces the load on backend servers by evenly distributing traffic. | Can face challenges in handling complex traffic patterns or large-scale application deployments. |
What Is Layer 7 (L7) Load Balancing?
If you need to route traffic based on the actual data inside, Layer 7 load balancing is what you want. It lets the system look inside the data packets and decide where they go.
Some newer load balancers can even handle encrypted traffic. They can check the contents, then send them to the right server after re-encrypting.
Layer 7 switching operates at the application layer. This type of switching is also called:
- Request switching
- Application switching
- Content-based routing
Like Layer 4 load balancing, the load balancer shows the server cluster as a single virtual server. It then distributes requests based on performance health checks. The network load balancer uses these checks to assess the performance of each application.
What Is Layer 7 (L7) Load Balancing Used for?
Layer 7 load balancing is useful when you want to route traffic based on what kind of data it is. For example, video traffic might go to servers designed for that, while other data types go to different servers.
It’s also a big part of security. Web Application Firewalls (WAFs) work at this layer, looking for bad traffic. If anything suspicious is found, it gets blocked before it can reach your servers.
This kind of load balancing gives you more options to manage traffic, which helps with both performance and security.
Pros and Cons of Layer 7 Load Balancing
| Advantages | Drawbacks |
| Can route traffic based on the content of the data packets (e.g., URLs, HTTP headers). | More complex and resource-intensive than Layer 4 load balancing. |
| Ideal for applications that require deeper inspection or complex routing (e.g., video streaming, e-commerce). | May introduce some latency due to the extra processing of packet content. |
| Supports SSL offloading, improving performance for encrypted traffic. | Requires more processing power, which can affect performance with high traffic volumes. |
| Provides better security by allowing for web application firewall (WAF) integration. | More difficult to set up and manage compared to simpler Layer 4 load balancing. |
| Can make routing decisions based on advanced metrics (e.g., session persistence, content type). | May not be as fast for simple traffic needs, compared to Layer 4 load balancing. |
| Allows fine-tuned control over application traffic. | Needs more resources for handling traffic inspection, which can impact cost. |
| Can handle encrypted traffic by decrypting, inspecting, and then re-encrypting before forwarding. | Not suitable for high-volume, low-latency applications where speed is critical. |
| Provides more flexibility for complex traffic management, such as content-based routing. | Could potentially create bottlenecks if not properly configured. |
How Layer 7 Load Balancing Differs?
Layer 7 load balancing differs from Layer 4 because it requires application teams to ensure their systems are finely tuned for optimal performance.
What sets Layer 7 apart is that, unlike Layer 4, the servers don’t serve identical content. Instead, they handle different tasks in the process, effectively passing the request between them. For example:
- Server 1 handles images and graphics.
- Server 2 manages the site’s content, including CSS, HTML, and scripts.
- Server 3 processes the user’s purchase.
- Server 4 delivers the purchased items.
This system enables more sophisticated management of content and resources, allowing for more detailed application and content delivery models based on the actual demands of each server.
When to Think About Load Balancing?
Picture this: You run an online store. At first, your server handles everything just fine. But as more customers visit, the server starts to slow down. Pages take forever to load, checkout fails, and sometimes, the server crashes. This frustrates your customers.
Here’s when you should think about using load balancing:
- Too Much Traffic: Your server struggles to handle the increase in visitors.
- Slow Performance: Pages take too long to load, especially during busy times.
- Frequent Crashes: Your server crashes because it can’t handle the demand.
- Business Growth: Your store is growing, and you need a solution that can grow with it.
- Uptime Is Crucial: You need your website to stay up and running, even if a server fails.
By adding more servers and spreading the load, you can keep your site running smoothly, avoid slowdowns, and reduce the chances of crashes.
Layer 4 or Layer 7: Which One to Choose?
In many cases, you might need both Layer 4 and Layer 7, but it depends on what you’re trying to achieve.
If you just need to direct traffic to servers quickly and don’t need to inspect the content of the data, Layer 4 is the right choice. It’s fast, simple, and works well for straightforward routing.
However, if your situation is more complex—like routing data for video streaming, ensuring a user’s shopping cart stays consistent, or caching data—then Layer 7 is better. This layer lets you inspect the data, making it more flexible for handling specific content and user sessions.
Summary:
- Choose Layer 4 for fast, no-frills routing.
- Choose Layer 7 when you need more detailed control, like handling content types or maintaining user sessions.
How Cloudways Autonomous Handles Load Balancing?
Cloudways Autonomous is a fully managed hosting solution for WordPress that takes care of load balancing and autoscaling automatically. This ensures that your website performs optimally no matter how much traffic it gets. With Cloudways Autonomous, you don’t have to worry about resource management or server overloads because the system adjusts in real-time to meet your website’s traffic demands.
Powered by Kubernetes, Cloudways Autonomous efficiently handles traffic distribution and resource scaling without requiring manual intervention. This is made possible by Layer 7 load balancing, which ensures that traffic is intelligently distributed to the right server pods based on your website’s needs.
Simple Setup, No Configuration Needed
Cloudways Autonomous handles everything for you. All you need to do is choose your plan, set up your WordPress or WooCommerce site, and point your domain. There is no need to configure load balancing settings or worry about scaling your infrastructure. It’s all taken care of by default.
Do check out my guide on how to set up WordPress load balancing to get an idea of how time-consuming it is to achieve this manually.
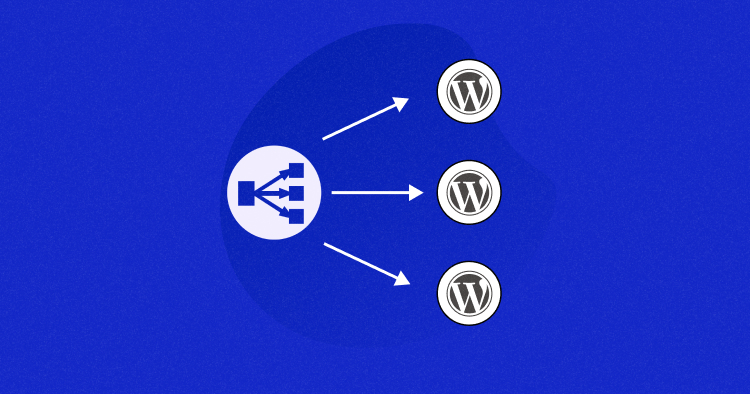
How Load Balancing Works on Cloudways Autonomous?
Imagine your eCommerce site during peak periods, like Black Friday, when many customers are accessing the site at the same time. When a user visits, the request first goes through Cloudflare, which protects and accelerates your site. From Cloudflare, the request is forwarded to a primary cloud load balancer. This load balancer then distributes the incoming traffic to multiple WordPress pods (e.g., Pod 1, Pod 2, Pod N), ensuring that no pod becomes overloaded.
Each pod processes the request by retrieving data from Redis for caching, accessing file storage for media, and querying a centralized database for dynamic content. The response is then sent back to the user via the load balancer and Cloudflare.
For administrative tasks, SSH connections are routed through a secondary load balancer that directs traffic to an available SSH pod for secure management access.
Why Cloudways Autonomous Stands Out?
Unlike many of our competitors, Cloudways Autonomous includes both load balancing and autoscaling as part of its standard offering. Many hosting providers require you to manage these features separately or don’t offer autoscaling at all.
With Cloudways Autonomous, load balancing is seamlessly integrated with Kubernetes, making it more efficient and ensuring that your site remains responsive even during traffic spikes.
By automatically scaling resources and distributing traffic intelligently, Cloudways Autonomous guarantees a smooth and reliable performance for both customers and administrators, without any manual configuration or intervention.
Simplified WordPress Load Balancing with Cloudways Autonomous
No configurations needed! Enjoy built-in autoscaling and load balancing, fully managed to handle any traffic.
Conclusion
In the end, Layer 7 is usually the first choice, offering a user-friendly, flexible full application reverse proxy. However, Layer 4 might be a better fit if you need higher throughput and simpler network transparency.
The key point is that all these techniques work well together and complement each other.
With our Kubernetes-based infrastructure, Cloudways Autonomous handles performance, uptime, and security for you.
Its autoscaling and load balancing ensure your site remains fast, secure, and stable — even during high-traffic periods and major sales events. Plans start from just $35.
Abdul Rehman
Abdul is a tech-savvy, coffee-fueled, and creatively driven marketer who loves keeping up with the latest software updates and tech gadgets. He's also a skilled technical writer who can explain complex concepts simply for a broad audience. Abdul enjoys sharing his knowledge of the Cloud industry through user manuals, documentation, and blog posts.